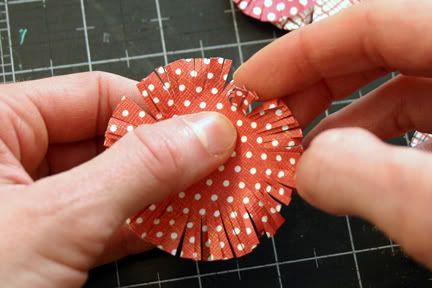
I missed step 2 somewhere?JulianaM wrote:Step #3:
Once you have all the fringes cut on all of your circles you are going to run you finger around the edges to separate the fringes and crinkle them a bit. Don’t worry if you bend a few or if some get torn out. It adds dimension and character!


I wrote an instructional article for ACOT here on how to make button flowers:jaziscrapper wrote:What are button flowers?kittymomma wrote: OH my goodness--so pretty! I got this beautiful Evian bottle from my sister for Christmas--I am going to make a bunch of flowers that match my new scrap room and use that bottle as the vase! I love this!!! Of course I will add some button flowers as well
http://www.acherryontop.com/article?a=4390
~Beth
"Make it bigger, make it badder, make it awesome" -Duff Goldman
"They need a hero to tell them that sometimes the impossible can become possible, if you're AWESOME!" -Rhino
http://latteonthebrain.blogspot.com/


"Make it bigger, make it badder, make it awesome" -Duff Goldman
"They need a hero to tell them that sometimes the impossible can become possible, if you're AWESOME!" -Rhino
http://latteonthebrain.blogspot.com/


Thanks Beth! I figured there was one on here somewhere!!!Beth-W wrote:I wrote an instructional article for ACOT here on how to make button flowers:jaziscrapper wrote:What are button flowers?kittymomma wrote: OH my goodness--so pretty! I got this beautiful Evian bottle from my sister for Christmas--I am going to make a bunch of flowers that match my new scrap room and use that bottle as the vase! I love this!!! Of course I will add some button flowers as well
http://www.acherryontop.com/article?a=4390
my blog...17turtles
HAPPILY designing for:
Bo Bunny
Circut Circle
http://jillibeansoup.typepad.com/my_weblog/
HAPPILY designing for:
Bo Bunny
Circut Circle
http://jillibeansoup.typepad.com/my_weblog/
Step #4:
Now you are going to start building your flowers. You may have already thought about this as you were cutting your circles, but now you are going to layer the different patterns starting from largest to smallest. I tried to have a good mix and not repeat the same pattern on the same flower.
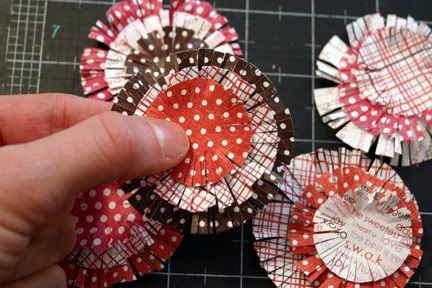
Now you are going to start building your flowers. You may have already thought about this as you were cutting your circles, but now you are going to layer the different patterns starting from largest to smallest. I tried to have a good mix and not repeat the same pattern on the same flower.

my blog...17turtles
HAPPILY designing for:
Bo Bunny
Circut Circle
http://jillibeansoup.typepad.com/my_weblog/
HAPPILY designing for:
Bo Bunny
Circut Circle
http://jillibeansoup.typepad.com/my_weblog/
Did you find it? It's on page 2.ctaylor0312 wrote:I missed step 2 somewhere?
my blog...17turtles
HAPPILY designing for:
Bo Bunny
Circut Circle
http://jillibeansoup.typepad.com/my_weblog/
HAPPILY designing for:
Bo Bunny
Circut Circle
http://jillibeansoup.typepad.com/my_weblog/
I did now that you pointed it out. Thanks, what a dummy I am. Thanks . . .


Step #5:
Once you have done Step #4 you are going to adhere the layers to each other. I used double sided foam tape (3M Scotch) to give them more dimension, plus it gives the centers more strength for the next steps. I imagine any type of foam adhesives would work.
Once you have done Step #4 you are going to adhere the layers to each other. I used double sided foam tape (3M Scotch) to give them more dimension, plus it gives the centers more strength for the next steps. I imagine any type of foam adhesives would work.
my blog...17turtles
HAPPILY designing for:
Bo Bunny
Circut Circle
http://jillibeansoup.typepad.com/my_weblog/
HAPPILY designing for:
Bo Bunny
Circut Circle
http://jillibeansoup.typepad.com/my_weblog/
Shanscraps wrote: I'm such a flower freak... These are great...
Me too!!!
Em
My blog

My blog

2 steps in ONE!!!!!
Step #6:
Once you have got the flowers together you need to poke 2 small hold in the center as guides to run the craft wire through. I used a large sewing needle, but a paper piercer of any kind will do just fine.
Step #7:
Cut 2 foot lengths of craft wire for as many flowers as you are going to make. You may not need the full length, but it allows you some flexibility in varying the heights of the flowers when you arrange them in your vase
my blog...17turtles
HAPPILY designing for:
Bo Bunny
Circut Circle
http://jillibeansoup.typepad.com/my_weblog/
HAPPILY designing for:
Bo Bunny
Circut Circle
http://jillibeansoup.typepad.com/my_weblog/
Thanks Beth, I'll definitely give the button flowers a try.
Oh I can't wait to make these flowers this afternoon. They are so adorable!
Step #8:
Thread the craft wire up through one of the holes from the bottom of the flower then down through the other hole. Try to center the flower on the length of wire. Pull the two pieces down and gently twist the together on the back side of the flower. Then bring the 2 wires together and twist them together a few times to make the flower stem. I also twisted them together tightly on the ends to make sure the wires stayed together
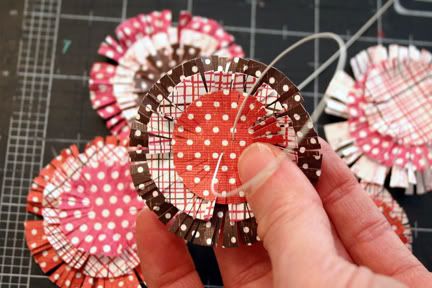
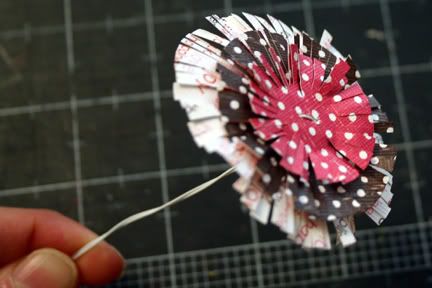
Thread the craft wire up through one of the holes from the bottom of the flower then down through the other hole. Try to center the flower on the length of wire. Pull the two pieces down and gently twist the together on the back side of the flower. Then bring the 2 wires together and twist them together a few times to make the flower stem. I also twisted them together tightly on the ends to make sure the wires stayed together


my blog...17turtles
HAPPILY designing for:
Bo Bunny
Circut Circle
http://jillibeansoup.typepad.com/my_weblog/
HAPPILY designing for:
Bo Bunny
Circut Circle
http://jillibeansoup.typepad.com/my_weblog/
I think so far the trickiest part is going to be cutting the fring, your's is so even. I know I'm gonna have one long cut then a short one. I can just see it now.


Don't stress over this. Maybe try practicing on a straight strip of paper first.ctaylor0312 wrote: I think so far the trickiest part is going to be cutting the fring, your's is so even. I know I'm gonna have one long cut then a short one. I can just see it now.
Once you get the hang of it you'll be fine!!!
my blog...17turtles
HAPPILY designing for:
Bo Bunny
Circut Circle
http://jillibeansoup.typepad.com/my_weblog/
HAPPILY designing for:
Bo Bunny
Circut Circle
http://jillibeansoup.typepad.com/my_weblog/
Here's my flower so far. Forgot to get craft wire yesterday, so I'll have to finish up tomorrow (when I get to the store)


Em
My blog

My blog

Adorable girl!!!!emarie803 wrote: Here's my flower so far. Forgot to get craft wire yesterday, so I'll have to finish up tomorrow (when I get to the store)
my blog...17turtles
HAPPILY designing for:
Bo Bunny
Circut Circle
http://jillibeansoup.typepad.com/my_weblog/
HAPPILY designing for:
Bo Bunny
Circut Circle
http://jillibeansoup.typepad.com/my_weblog/


